Gone Golfing Laser Cut Sign
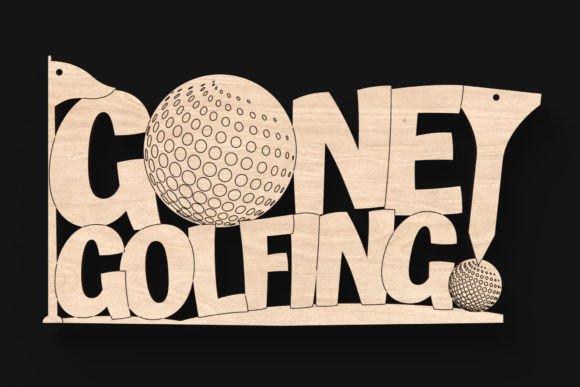
For any golf enthusiast, displaying their love for the game in a creative and stylish way is always appealing. The Gone Golfing Laser Cut Sign offers a fun and eye-catching way to celebrate the sport. With its clever design that incorporates a golf ball as the letter "O," a flag, golf balls, and a tee shaped like an exclamation point, this sign is both decorative and meaningful. Measuring around 30cm wide, it’s ideal for spaces like home offices, garages, or even golf lockers. But like any design project, there are a few key considerations to keep in mind to ensure you get the best results and avoid common pitfalls.
What Makes the Gone Golfing Laser Cut Sign Unique?
This design stands out due to its thoughtful integration of golf elements directly into the lettering. The laser-cut detail adds depth and texture, making the sign visually engaging. It's not just a decorative item—it's a personalized statement for anyone who loves hitting the links. The flexibility of the design allows for resizing, making it suitable for different display needs, from wall art to locker decor.
Available in multiple file formats—AI, EPS, DXF, PDF, and SVG—it’s compatible with a wide range of design software and laser cutting machines. Whether you're using Lightburn, Lasercut, or RDWorks, this design is optimized for precision and ease of use. That makes it a solid choice for hobbyists and professionals alike.
Common Mistakes When Choosing or Using This Design
While the Gone Golfing Laser Cut Sign is a well-crafted design, users often make a few key errors that can impact the final result. Understanding these can help you avoid unnecessary frustration or poor-quality output.
1. Overlooking File Compatibility
Though the design comes in multiple formats, not all laser cutting machines or software work equally well with every file type. For example, some older machines may struggle with SVG files, while newer software like Lightburn may handle them seamlessly. Failing to verify file compatibility with your specific setup can lead to import errors or distorted cuts.
Better approach: Check your machine’s specifications and recommended file types before downloading. If unsure, test the file with a small, non-critical project first.
2. Ignoring Material Thickness and Type
The design is optimized for laser cutting, but different materials—like acrylic, wood, or metal—require different power and speed settings. Using the same settings across materials can result in undercuts, burns, or incomplete cuts.
Better approach: Always test your settings on a scrap piece of the same material you’ll use for the final product. Adjust power and speed accordingly to ensure clean, accurate cuts.
3. Resizing Without Adjusting Detail
While the design is scalable, reducing it too much can cause small details—like the dimples on the golf ball O or the tee—to become lost or unrecognizable. Similarly, enlarging it beyond a certain point might make the design look sparse or require more material than expected.
Better approach: Resize gradually and preview the design at each stage. If scaling down, consider simplifying smaller elements to maintain clarity. When scaling up, check that your material size and machine bed can accommodate the new dimensions.
4. Underestimating Mounting and Display Needs
Some users focus solely on the design and cutting process but forget to plan how they’ll mount or display the finished sign. A beautifully cut sign can lose its appeal if it’s difficult to hang or looks unstable on the wall.
Better approach: Consider adding mounting holes or backing during the design phase. Alternatively, plan to use standoffs or adhesive mounting strips that match the style of the sign and the surface it will be placed on.
What to Check Before Finalizing Your Design
Before you proceed with cutting or purchasing the design, take a few moments to review these key points:
- Design integrity: Ensure all elements are properly aligned and grouped, especially if you’ve made edits.
- Layer settings: Confirm that each layer in your design software is set correctly for cut depth and speed.
- File resolution: Use high-resolution files to maintain clarity, especially when engraving details like the golf ball texture.
- Material preparation: Clean and properly secure your material before cutting to prevent shifting or uneven results.
Maximizing the Value of Your Gone Golfing Laser Cut Sign
If you're creating this sign as a gift or for resale, presentation matters. A well-finished sign with clean edges and thoughtful mounting can significantly boost its perceived value. Consider adding a personal touch—like engraving initials or a short message—near the bottom of the sign to make it more special.
For entrepreneurs or small business owners, this design can be part of a themed product line. Pair it with other golf-related laser cut items—like mini flags or ball markers—for a cohesive offering that appeals to golf clubs, pro shops, or Father’s Day shoppers.
Conclusion
The Gone Golfing Laser Cut Sign is a versatile and charming design that speaks directly to the hearts of golf lovers. With its thoughtful details and compatibility with a wide range of machines and software, it’s a great addition to any laser cutting project. By avoiding common mistakes related to file use, material choice, and display planning, you can ensure your final product looks professional and lasts longer. Whether you're making it for yourself or for sale, a little attention to detail can make a big difference in the final result.